System Errors


How to fix second monitor not working in Monterey 12.4

second monitor not working monterey 12.4

Currently, the newest macOS version is macOS Monterey 12.4, which released on 16th of May 2022. Though the changelog released by Apple is incredibly short, the update brought many important security fixes to the operating system. That said, if you haven’t updated to 12.4, you might want to wait a bit longer, because it also introduced a pretty serious bug. It only concerns those that use more than one monitor, though, so if you’re only using a single one – feel free to update. And for those unfortunate users who have already updated and are now experiencing issues with their second monitor not working in Monterey 12.4, we have prepared this article. Read below for more information on the bug and on how to fix it.

More information about the bug

This is how the users report the issue:

  • “My second monitor is not working, Monterey 12.4”
  • “The recent update broke my multi-monitor setup”
  • “2nd display doesn’t work on Monterey 12.4”

However, these reports are somewhat misleading. The update doesn’t break the ability to use more than one display completely. Rather, the error boils down to this: when booting up, or when waking from sleep, the OS will sometimes fail to initialize the 2nd (and possibly other external displays, if you have more than two) display. This results in the second monitor not displaying anything. However, you can get your external monitor(s) working again relatively easily.

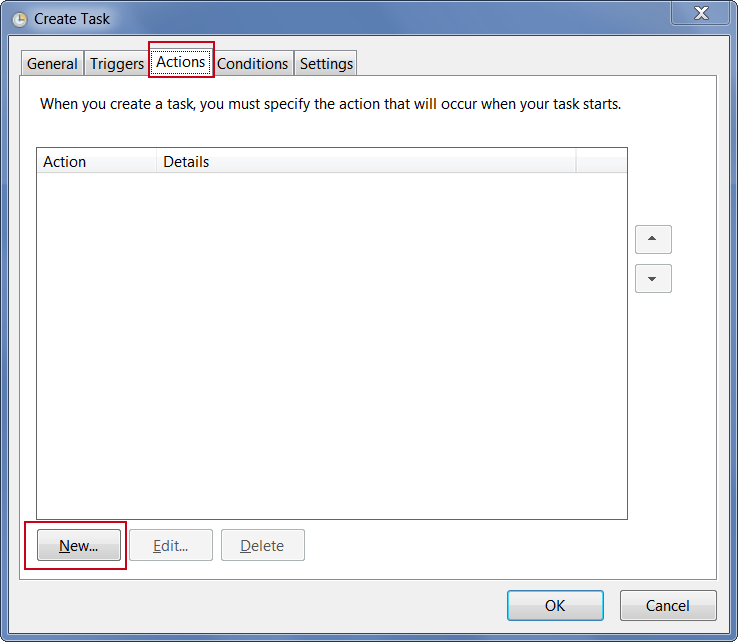
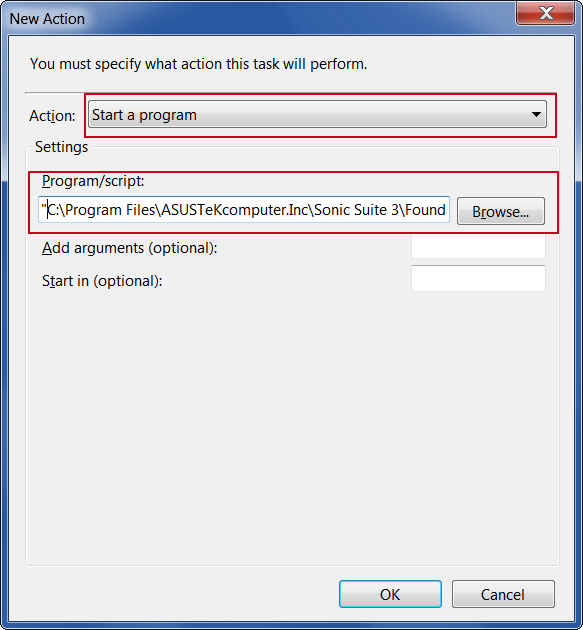
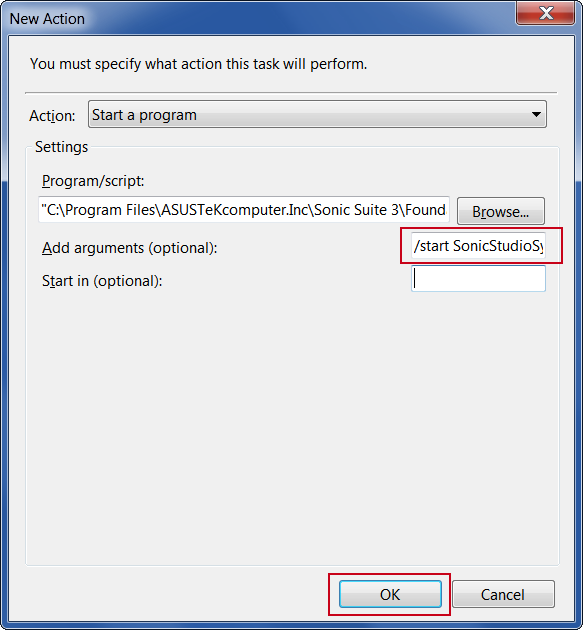
Second monitor not working in Monterey 12.4: the workaround

To get your second display working, you will need to follow these steps.
First, open Apple Logo > System Preferences > Displays. Several windows should open – one window for each display you have. Find the display that doesn’t work. Then, change the display’s refresh rate. Simply select any option in the Refresh Rate drop-down menu other than the one it is currently on.
second display not working monterey 12.4
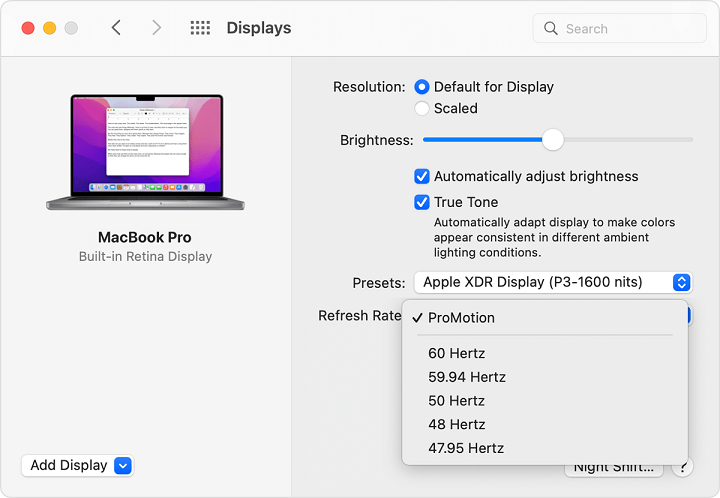
This should get the monitor back in working order. However, we recommend that you change the refresh rate setting to its original value. You should do this because setting refresh rate to an improper value may result in increased eye strain, as well as flickering.
You should note that this solution is temporary in nature. This method does not fix the issue, it only lets you make the monitor work. So you will have to do it every time the error occurs. Quite annoying, yes, but ultimately only Apple can fix this. This workaround will have to do until the bugfix comes.

How to fix Windows 10 0x0000007c printing error

How to fix printing error 0x0000007c

Since the latest Windows 10 security update (October), many users have started to experience problems when adding or printing to network printers. When a user tries to print something, he or she faces a pop-up notification stating: “Windows cannot connect to the printer. Operation failed with error 0x0000007c”. Below in this guide, you will find several methods to fix 0x0000007c printing error.

fix error 0x0000007c on Windows 10

Automatic solution

Repairing system errors may be not be an easy task, so we should warn you that performing some of the steps may require above-average skills, so if you don’t feel experienced enough, you may apply to the automatic tool.

Download Advanced System Repair

The Advanced System Repair is an all-in-one tool for users who want to forget about numerous system issues like error 0x0000007c on Windows 10. All you need to is to launch it, the program itself will find and fix all detected problems automatically.

Or you may use manual methods:

Solution:

Here are different instructions depending on the version of Windows 10.

Registry value to add (Windows 10 2004, 20H2, 21H1 and 21H2):

[HKEY_LOCAL_MACHINE\SYSTEM\CurrentControlSet\Policies\Microsoft\FeatureManagement\Overrides] “713073804”=dword:00000000

Registry value to add (Windows 10 1909):

[HKEY_LOCAL_MACHINE\SYSTEM\CurrentControlSet\Policies\Microsoft\FeatureManagement\Overrides] “1921033356”=dword:00000000

Registry value to add (Windows 10 1809 and Windows Server 2019):

[HKEY_LOCAL_MACHINE\SYSTEM\CurrentControlSet\Policies\Microsoft\FeatureManagement\Overrides] “3598754956”=dword:00000000

As we stated before, you can follow the solutions provided by this guide at your own risk. In case if you don’t feel experienced enough, you may apply to the automatic tool.

Download Advanced System Repair

How to fix PrintNightmare print issue on Windows 10

How to fix printing PrintNightmare print issue

PrintNightmare is a critical vulnerability that affects the Print Spooler service, which is pre-enabled on all machines. As you probably know, this service is required for printing, and it is also enabled on devices that are not connected to printers. According to reports, the Print Nightmare vulnerability is actively used by attackers to obtain local privileges and remotely execute code on the affected machines. This vulnerability was discovered last week after security researchers accidentally published the exploit code on GitHub. In this regard, Microsoft has started to release an emergency update of Windows 10 KB5004945 to fix the security error PrintNightmare, affecting all supported versions of Windows 10. Since the Print Spooler service is enabled in Windows by default, Microsoft has released a patch for Windows Server 2019, Windows Server 2012 R2, Windows Server 2008, Windows 7, Windows 8.1, Windows RT 8.1 and supported versions of Windows 10.

fix PrintNightmare print issue on Windows 10

How to Fix the Print Nightmare vulnerability in Windows 10

To fix the Print Nightmare vulnerability, follow these steps:

  1. Open Windows Settings –> Updates and Security –> Windows Update.
  2. Click “Check for updates”.
  3. The new July patch will automatically start downloading to your device.
  4. After downloading the patch, click “Restart Now”.

If you don’t want to install an emergency update, there is a second workaround – disable the Windows Print Spooler service.

How to reduce the impact of Print Nightmare on the Print Spooler service

If you don’t install the recommended security update KB5004945, your device will become vulnerable to PrintNightmare security issues. According to reports, an attacker can remotely gain access to a domain controller and take over the entire domain if using an error. Fortunately, you can temporarily disable the print queue manager to protect your device from the effects of the zero-day PrintNightmare program. To manually reduce the vulnerability, follow these steps

  1. Click the Start or Search icon, and then type “powershell” in the search box.
  2. Click “Run as Administrator” to open PowerShell with administrative privileges.
  3. Type: “Stop-Service -Name Spooler -Force” and press Enter.
  4. Type: “Set-Service -Name Spooler -StartupType Disabled” and press Enter.

When you run the two above commands, Windows will disable and prevent the Print Spooler service from starting again.

Windows 10 showing 0xc1900223 error while updating to 1903

What is error 0xc1900223

0xc1900223 is a system error that may pop up while updating Windows 10 to v.1903. This indicates that there was a problem downloading and installing the selected update. It usually looks like this: once the update is downloaded, Windows prepares to install it, gets to 88%, then fails. The causes of the problem may be different: bugs in Windows updates, incorrectly configured system settings, corrupted registry entries, and other similar major issues. In this guide, we will show you how to quickly and easily solve the problem associated with feature update to Windows 10, version 1903 – error 0xc1900223.

fix error 0xc1900223 on Windows 10

Automatic solution

Repairing system errors maybe not an easy task, so we should warn you that performing some of the steps may require above-average skills, so if you don’t feel experienced enough, you may apply to the automatic tool.

Download Advanced System Repair

The Advanced System Repair is an all-in-one tool for users who want to forget about numerous system issues like error 0xc1900223 on Windows 10. All you need to is to launch it, the program itself will find and fix all detected problems automatically.

Or you may use manual methods:

Solution 1: Update manually via Media Creation Tool

  1. To obtain Media Creation Tool, follow this link
  2. Click Download tool now
  3. error 0xc1900223

  4. Launch MediaCreationTool, select Upgrade This PC Now, and click Next
  5. error 0xc1900223

  6. The Windows will automatically start downloading and installing the latest updates. In most cases, that should take care of your problems.

Solution 2

If previos method didn’t work, try using Microsoft support article to fix update issues


note

As we stated before, you can follow the solutions provided by this guide at your own risk. In case if you don’t feel experienced enough, you may apply to the automatic tool.

Download Advanced System Repair

How to fix error status 0xc000012f on Windows 10

How to fix error status 0xc000012f

0xc000012f is a system error that most often occurs among Windows 10 users. The causes of the problem may be different: bugs in Windows updates, incorrectly configured system settings, corrupted registry entries, and other similar major issues. The error pops up with the following message:

“C:\Windows\System32\Windows.Storage.ApplicationData.dll is either not designed to run on Windows or it contains an error. Try installing the program again using the original installation media or contact your system administrator of the software vendor for support. Error status 0xc000012f”

fix error 0xc000012f on Windows 10

You may follow this guide to fix 0xc000012f error code on Windows 10.

Automatic solution

Repairing system errors maybe not an easy task, so we should warn you that performing some of the steps may require above-average skills, so if you don’t feel experienced enough, you may apply to the automatic tool.

Download Advanced System Repair

The Advanced System Repair is an all-in-one tool for users who want to forget about numerous system issues like error 0xc000012f on Windows 10. All you need to is to launch it, the program itself will find and fix all detected problems automatically.

Or you may use manual methods:

Solution 1

  1. Press Windows button + R, type cleanmgr and click OK
  2. fix error 0xc000012f on Windows 10

  3. In the opened Disc Cleanup, select drive (C:\) and click OK
  4. fix error 0xc000012f on Windows 10

  5. In the opened menu, mark the Setup log files, Recycle bin, and Temporary files section, then click Clean up System Files.
  6. error 0xc000012f

  7. After the process is done, reboot your computer.

Solution 2

  1. Open the Start Menu, then type: cmd in the search box
  2. Right-click the result and then click Run as Administrator
  3. error 0xc000012f

  4. Type: SFC /SCANNOW and hit Enter key.
  5. error 0xc000012f

  6. After the process is done, reboot your computer.

Solution 3

If nothing works, try using Microsoft support article to fix update issues


note

As we stated before, you can follow the solutions provided by this guide at your own risk. In case if you don’t feel experienced enough, you may apply to the automatic tool.

Download Advanced System Repair

How to fix 0X8007007e printing error

How to fix printing error 0X8007007e

Error 0X8007007e is common trouble that may appear when a user tries to print in Windows 10. Many users write, that it happens right after cumulative update for Windows 10 (especially for amd64-based systems). When a user tries to print something, he or she faces pop-up notification stating: “Your printer has experienced an unexpected configuration problem. 0X8007007e”. Below in this guide, you will find several methods to fix 0X8007007e printing error.

fix error 0X8007007e on Windows 10

Automatic solution

Repairing system errors maybe not an easy task, so we should warn you that performing some of the steps may require above-average skills, so if you don’t feel experienced enough, you may apply to the automatic tool.

Download Advanced System Repair

The Advanced System Repair is an all-in-one tool for users who want to forget about numerous system issues like error 0X8007007e on Windows 10. All you need to is to launch it, the program itself will find and fix all detected problems automatically.

Or you may use manual methods:

Solution 1

  1. Press Windows button + R and type spool and click OK
  2. In the opened spool (C:\Windows\System32\spool), navigate to drivers folder
  3. In the search field, type Printconfig.dll
  4. Printconfig.dll search
    You will most likely get multiple results, it’s okay

  5. Locate the x64 DLL file and copy it to C:\Windows\System32\spool\drivers\x64\3 folder
  6. Click Continue if it asks for administrator’s permission
  7. Done

note

In case if it doesn’t solve the problem, try to copy/paste another Printconfig.dll file


Solution 2

  1. Navigate to C:\Windows\System32\spool\drivers\x64\PCC folder
  2. Double-click prnms003.inf_amd64_9542e8cf351e300e.cab file. The Printconfig.dll file is located in this CAB file.
  3. Right-click Printconfig.dll and click Extract
  4. extract Printconfig.dll

  5. Extract the Printconfig.dll file to C:\Windows\System32\spool\drivers\x64\3
  6. Done

Solution 3

If nothing works, try using Microsoft support article to fix update issues


note

As we stated before, you can follow the solutions provided by this guide at your own risk. In case if you don’t feel experienced enough, you may apply to the automatic tool.

Download Advanced System Repair

How to fix printer issues after Windows 10 update

How to fix printer issues

Since the latest Windows 10 update (KB4524147 or KB4517211), many users have started to experience problems with the printer (cannot print after Windows 10 update). For example, the user tries to print something, selects a printer, and when he or she clicks “Print”:

  • nothing happens
  • the user gets an error saying there are no printers installed
  • or program does not show any printers

fix printer issues on Windows 10
In most cases, this problem occurs only in the Google Chrome browser, and other applications like Word or Outlook print without problems. The main culprit responsible for this is Windows itself, specifically KB4524147 and KB4517211 Windows updates. In this guide, you will find detailed instructions on how to fix printer issues on Windows 10.

Automatic solution

Repairing system errors maybe not an easy task, so we should warn you that performing some of the steps may require above-average skills, so if you don’t feel experienced enough, you may apply to the automatic tool.

Download Advanced System Repair

The Advanced System Repair is an all-in-one tool for users who want to forget about numerous system issues like printer issues on Windows 10. All you need to is to launch it, the program itself will find and fix all detected problems automatically.

Or you may use manual methods:

This error is actually caused by the latest Windows 10 update so the first thing we need to do is to uninstall it. To do so:

  1. Open the Start Menu, and click Settings
  2. In Settings menu, go to Update & security and click on the View Update History
  3. printer issues

  4. On the View Update History page, click on Uninstall updates
  5. printer issues

  6. On the next screen, in the search box type: KB4524147
    printer issues

  7. Select it, click Uninstall button, and then click Yes on the confirmation box
  8. Type: KB4517211
  9. Select it, click Uninstall button, and then click Yes on the confirmation box
  10. Restart your PC

If it it didn’t help, you may try using Microsoft support article to fix printer issues

As we stated before, you can follow the solutions provided by this guide at your own risk. In case if you don’t feel experienced enough, you may apply to the automatic tool.

Download Advanced System Repair

How to fix “VMware Workstation Pro can’t run on Windows”

How to fix a problem with launching VMware Workstation on Windows 10

Many users encountered difficulties related to the VMware Workstation Pro after the Cumulative Update (September Windows Update). They have discovered that the installation of updates, in particular, KB4517211, has caused the failure of VMware Workstation software to start. The program fails to launch displaying the following message: “VMware Workstation Pro can’t run on Windows”. Below in this guide, you will find several methods to fix “VMware Workstation Pro can’t run on Windows” error.

fix error VMware Workstation Pro can't run on Windows

Automatic solution

Repairing system errors maybe not an easy task, so we should warn you that performing some of the steps may require above-average skills, so if you don’t feel experienced enough, you may apply to the automatic tool.

Download Advanced System Repair

The Advanced System Repair is an all-in-one tool for users who want to forget about numerous system issues like error “VMware Workstation Pro can’t run on Windows”. All you need to is to launch it, the program itself will find and fix all detected problems automatically.

Or you may use manual methods:


Solution 1:

This is the easiest way that can solve your problem. To do this, go to VMware Workstation location folder and rename the folder “vmplayer”. For example:
C:\Program Files (x86)\VMware\VMware Player\vmplayer
to
C:\Program Files (x86)\VMware\VMware Player\vmplayer1

Just that’s all


Solution 2

The second way is also quick and simple.

  1. Open the Start Menu, then type: regedit in the search box
  2. Right-click the result and then click Run as Administrator
  3. Go to [HKEY_LOCAL_MACHINE\SOFTWARE\Microsoft\Windows NT\CurrentVersion\AppCompatFlags] folder and apply the following:

    • "{3d9912c3-cb54-4f34-ab71-1d429553bf96}"=dword:00000077
    • "{66f21bbc-149a-411b-8e11-880af7c1266c}"=dword:00000077


Solution 3

If nothing works, try using Microsoft support article to fix update issues

As we stated before, you can follow the solutions provided by this guide at your own risk. In case if you don’t feel experienced enough, you may apply to the automatic tool.

Download Advanced System Repair

How to fix error 0x80073701 in Windows 10

How to fix error 0x80073701

Error 0x80073701 is common trouble that may appear when a user tries to install Windows 10 V1903 Updates. Many users write, that it happens right after running KB4512508 or KB4508451 cumulative update for Windows Version 1903 (especially for amd64-based systems). The error sometimes causes to the system problems that could be resolved with system recovery or cumulative updates, which are impossible to perform because of error 0x80073701. Below in this guide, you will find several methods to fix 0x80073701 error.

fix error 0x80073701 on Windows 10

Automatic solution

Repairing system errors maybe not an easy task, so we should warn you that performing some of the steps may require above-average skills, so if you don’t feel experienced enough, you may apply to the automatic tool.

Download Advanced System Repair

The Advanced System Repair is an all-in-one tool for users who want to forget about numerous system issues like error 0x80073701 on Windows 10. All you need to is to launch it, the program itself will find and fix all detected problems automatically.

Or you may use manual methods:

Solution 1: fix error 0x80073701 via Command Prompt

  1. Open the Start Menu, then type: cmd in the search box
  2. Right-click the result and then click Run as Administrator
  3. error 0x80073701

  4. Type following commands one-by-one followed by Enter key.

    • net stop wuauserv
    • net stop cryptSvc
    • net stop bits
    • net stop msiserver
    • Ren C:\Windows\SoftwareDistribution SoftwareDistribution.old
    • Ren C:\Windows\System32\catroot2 Catroot2.old
    • net start wuauserv
    • net start cryptSvc
    • net start bits
    • net start msiserver.

  5. Restart and try again

In most cases, this should solve the problem. If not, open Command Prompt once again and type following:

  • SFC /SCANNOW
  • DISM /Online /Cleanup-Image /AnalyzeComponentStore
  • DISM /Online /Cleanup-Image /StartComponentCleanup
  • DISM /Online /Cleanup-Image /CheckHealth
  • DISM /Online /Cleanup-Image /ScanHealth
  • DISM /Online /Cleanup-Image /RestoreHealth


Restart and proceed to update Windows 10.

Solution 2

If the previous method didn’t work, you may try downloading KB4512508 update manually by clicking on this link and install it.

Solution 3

If nothing works, try using Microsoft support article to fix update issues

As we stated before, you can follow the solutions provided by this guide at your own risk. In case if you don’t feel experienced enough, you may apply to the automatic tool.

Download Advanced System Repair

How to fix SS3svc32.exe popping up issue on Windows 10

How to fix SS3svc32.exe issue

After the latest Windows update, many users faced the problem related to SS3svc32.exe file. The User Account Control (UAC) started popping up on startup asking to allow SS3svc32.exe to make changes. It should be noted that this issue concerns only the owners of computers with the Asus motherboard. The fact is that SS3svc32.exe file (Sonic Studio 3) is a component of Realtek HD audio drivers suite, which is used in many ASUS mainboards and which after the update began to conflict with the system. Now, we all know that SS3svc32.exe is not malware and we don’t need to worry about computer security. Still, to stop SS3svc32.exe pop-up to appear each time you start the computer, you may follow this guide.

fix SS3svc32.exe issue on Windows 10

Automatic solution

Repairing system errors maybe not an easy task, so we should warn you that performing some of the steps may require above-average skills, so if you don’t feel experienced enough, you may apply to the automatic tool.

Download Advanced System Repair

The Advanced System Repair is an all-in-one tool for users who want to forget about numerous system issues like SS3svc32.exe issue on Windows 10. All you need to is to launch it, the program itself will find and fix all detected problems automatically.

Or you may use manual methods:

Solution 1

The easiest way to get rid of SS3svc32.exe pop-up is to allow the app to “run as administrator”. To do this:

  1. Locate the file SS3svc32.exe in explorer (it is usually located at c:\Program Files\ASUSTeKcomputer.Inc\Sonic Suite 3\Foundation\
  2. Right click the file and select Properties
  3. Go to the Compatibility tab and click the shield Change settings for all users button
  4. In the opened window, and enable the check box Run this program as an administrator
  5. Click Apply, then click OK

In most cases, this should solve the problem. If not, proceed to the next step.

Solution 2: Fix SS3svc32.exe pop-up via Task Scheduler

This method is much more complicated, therefore it is suitable only for experienced users.

  1. Open the Start Menu, then type: taskschd.msc in the search box and press Enter (If prompted by UAC, click on Yes)
  2. In the left pane of Task Scheduler, click on the Task Scheduler Library folder, then click on New Folder in the far right pane.
  3. SS3svc32.exe pop-up

  4. Type in a name (ex: program name “SS3svc32.exe”) you want for the new task folder to make finding the task easier, then click on OK
  5. SS3svc32.exe pop-up

  6. In the left pane of Task Scheduler, click on the new task folder (ex: SS3svc32.exe), and click on Create Task in the far right pane
  7. SS3svc32.exe pop-up

  8. Under the General tab, type in a name for the task (ex: Program Name “SS3svc32.exe”). Make sure Run with highest Privileges option is enabled.
  9. SS3svc32.exe pop-up

  10. Go to the Triggers tab and click New button.
  11. SS3svc32.exe pop-up

  12. In the Begin the task drop down menu list, select At startup. Next, make sure that Enabled is checked, and click on OK.
  13. SS3svc32.exe pop-up

  14. Under the Triggers tab, click on the New button.
  15. SS3svc32.exe pop-up

  16. In the Begin the task drop down menu list, select At log on. Next, make sure that Enabled is checked, and click on OK.
  17. SS3svc32.exe pop-up

  18. Go to the Actions tab and click New button.
  19. SS3svc32.exe pop-up

  20. In the Action drop down menu list, select Start a program, then click on the Browse button and select the program’s EXE file.
  21. SS3svc32.exe pop-up

  22. Copy and paste: /start SonicStudioSystray /silent to Add arguments (optional) box, and click OK
  23. SS3svc32.exe pop-up

note

We recall once again this method is only for advanced users so if you don’t feel experienced enough, you may apply to the automatic tool.

Download Advanced System Repair

We have provided two ways to solve this problem, but there is a third way and it’s actually the easiest. We figured out that this issue is caused by Windows 10 itself so we just can wait until Microsoft fixes this bug and release a new update.