System Errors


Windows 10 not detecting video card and drivers

How to fix driver issues on Windows 10

This article is written specifically for those users who are experiencing problems with detecting hardware and installing drivers on Windows 10 operating system. There are a lot of users that complain that Windows 10 can’t detect their device or it’s recognized incorrectly. After reading a lot of “angry” reviews on the forums, we came to the conclusion that this is the most relevant for video cards, in particular, video cards by Nvidia. That’s why we have written this guide for troubleshooting driver problems in Windows 10 using video cards as an example.

fix driver issues on Windows 10

Automatic solution

Repairing system errors maybe not an easy task, so we should warn you that performing some of the steps may require above-average skills, so if you don’t feel experienced enough, you may apply to the automatic tool.

Download Advanced System Repair

The Advanced System Repair is an all-in-one tool for users who want to forget about numerous system issues like driver issues on Windows 10. All you need to is to launch it, the program itself will find and fix all detected problems automatically.

Or you may use manual methods:

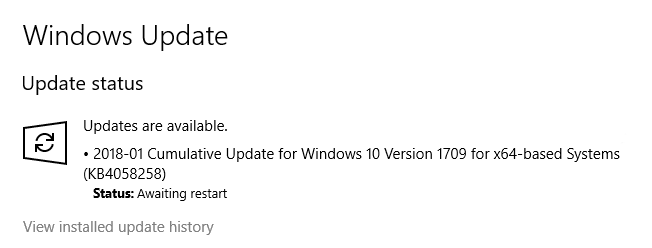
Solution 1. Fix driver issues through Windows Update

The first thing you need to do is to try installing drivers using Windows Update.
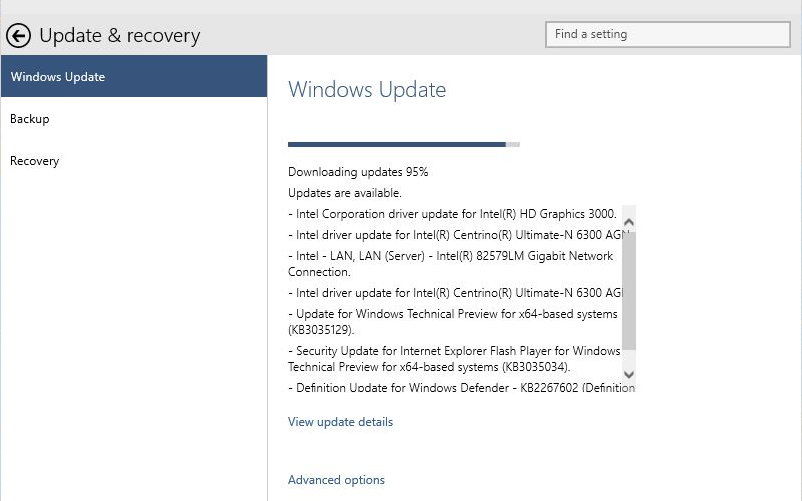
fix driver issues

  1. Press Windows+R
  2. Input ‘ms-settings:windowsupdate’ and hit the Enter key
  3. Click Check for updates
  4. Remove the below listed entries

In some cases, this should solve the problem: the system itself will detect all plugged hardware, find and install all required drivers.

Solution 2. Update driver manually

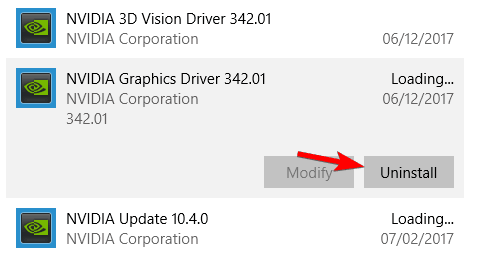
Let’s take an example of a video card from Nvidia. Before installing a new driver, you should remove all previous Nvidia drivers that you have. To do that follow these steps:

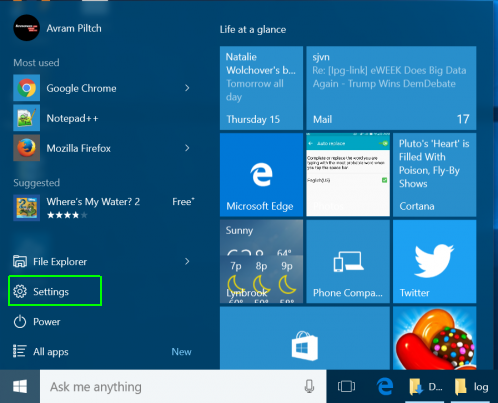
  1. Go to Settings and click Apps
  2. grafics card

  3. Find Nvidia drivers in the list and click Uninstall.
  4. grafics card

When you perform a previous step, you should download the latest software drivers from the manufacturer’s website for your computer model. Usually, drivers are located in the Support section from an official website. The way to find it will vary depending on the brand of the hardware. If you can’t get to the Drivers section, you can just enter a query using a search engine, for example, type: “Nvidia GTX 1060 drivers download‘. This will often provide a direct link.

grafics card

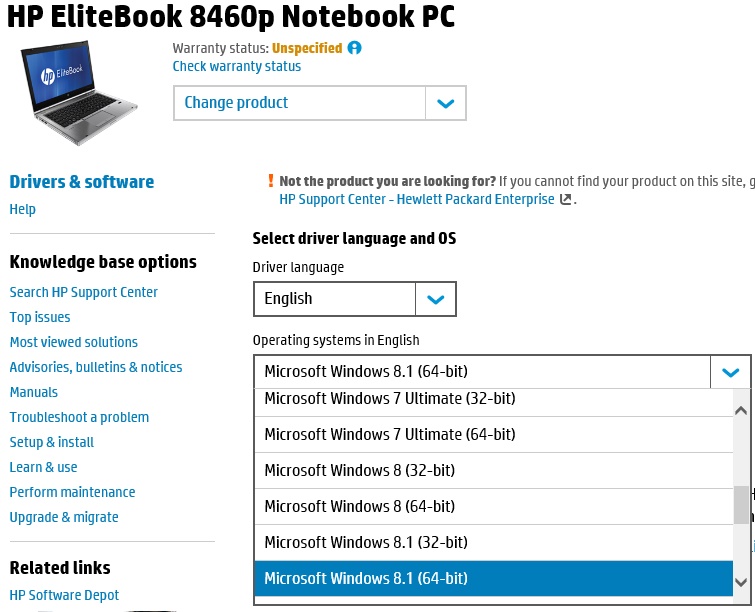
It’s okay if you haven’t found native Windows 10 drivers. In this case, download the latest Windows drivers available for your model. So if they only have Windows 7 drivers, try using those. One important point: make sure you download the right drivers for your architecture (32 or 64 bit).

grafics card

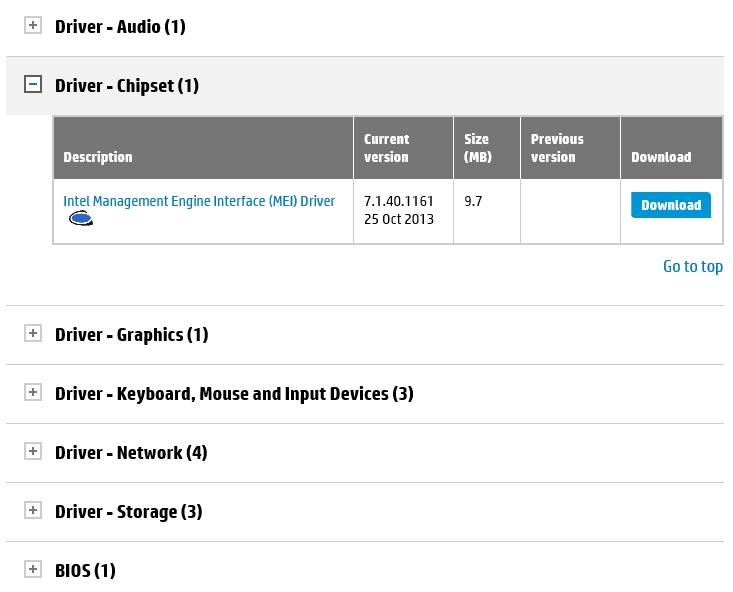
Download the latest drivers after selecting your version of Windows.

note

If you are not sure what type of system you are using, then simply right-click the My Computer or This PC icon and choose Properties – in the appeared window you will see the information on your system version and type of architecture (32 or 64 bit).

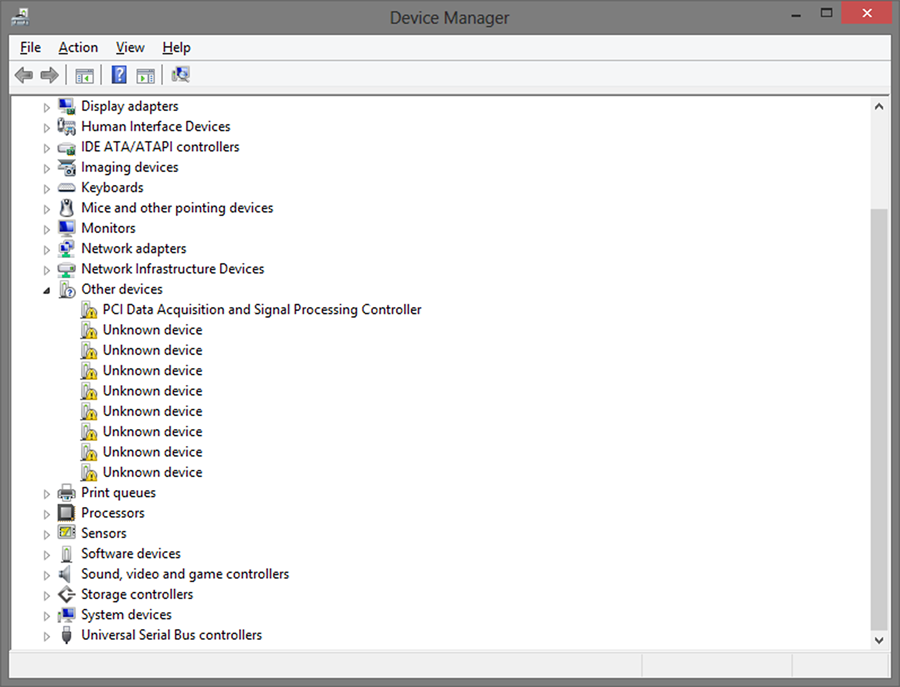
Solution 3. Install drivers using Device Manager

If the system failed to recognize your hardware, you should install drivers manually. To do this, you need to have drivers downloaded ( see above).

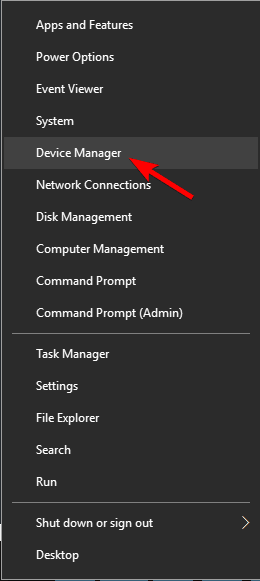
  1. Press Windows+X and click Device Manager.
  2. grafics card

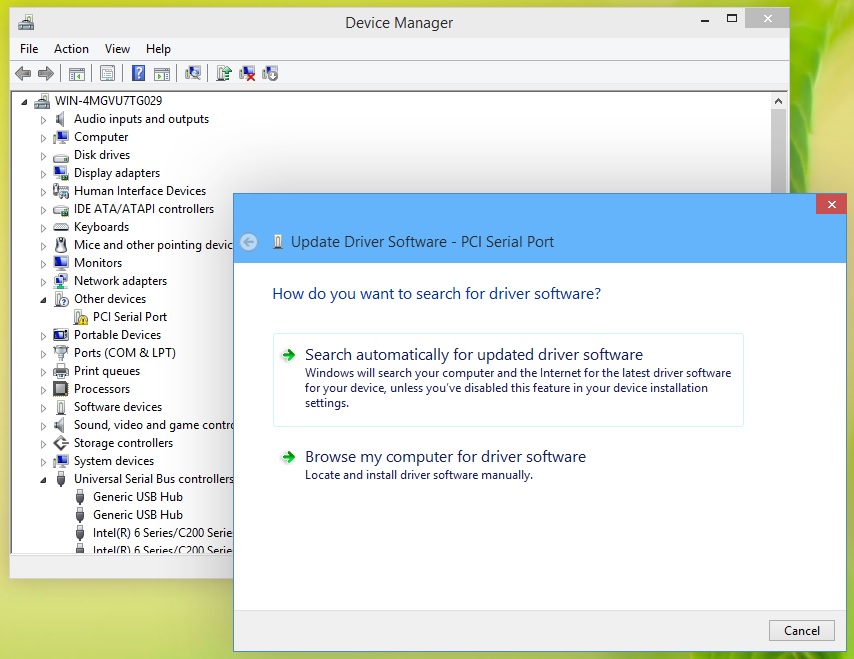
  3. Locate your device, right click it and select Update Driver Software
  4. grafics card

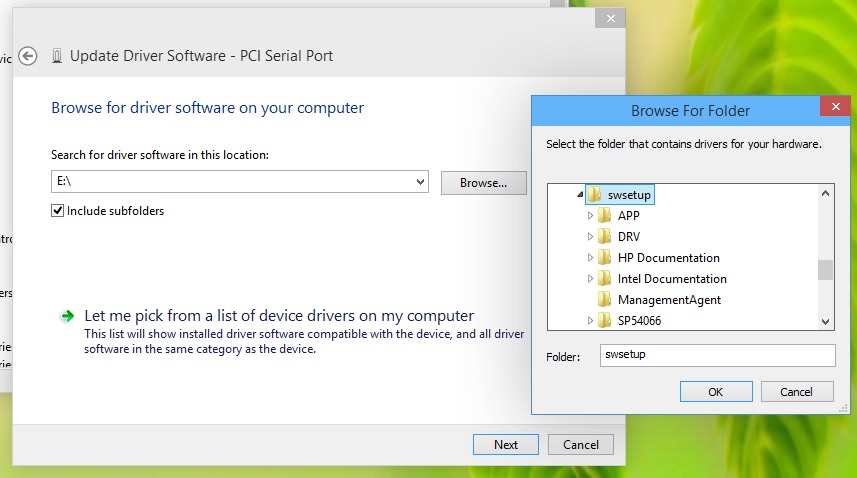
  5. Once Update Driver Software is open, select Browse my computer for driver software
  6. grafics card

  7. Click Browse and point location of your drivers. Windows automatically install it for you.
    grafics card

Solution 4. Make sure your graphics card is enabled in BIOS

This method is only for users who are experiencing problems with the video card. If your computer has both integrated and discrete graphics, your discrete video card might be disabled in BIOS by default. To fix it, follow these steps:

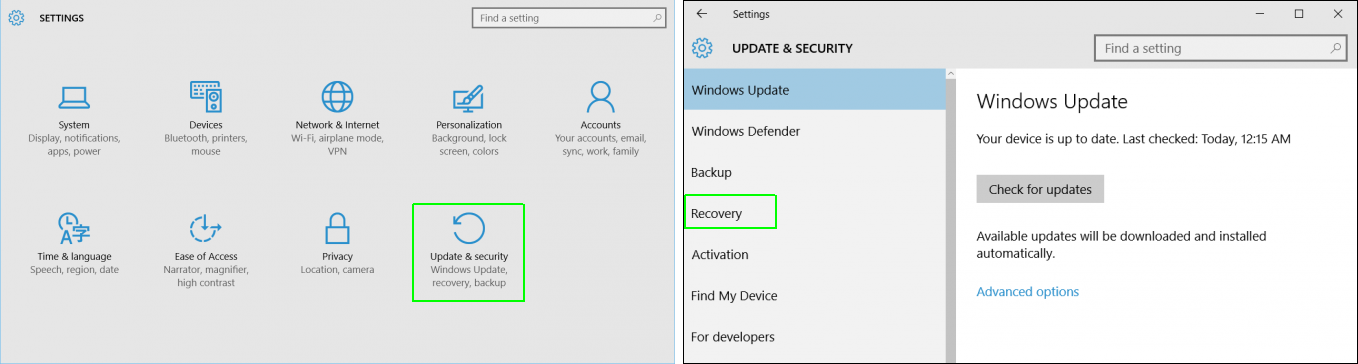
  1. Navigate to Settings (Windows + I).
  2. enable discrete in bios

  3. Select Update & Security, then go to Recovery.
  4. enable discrete in bios

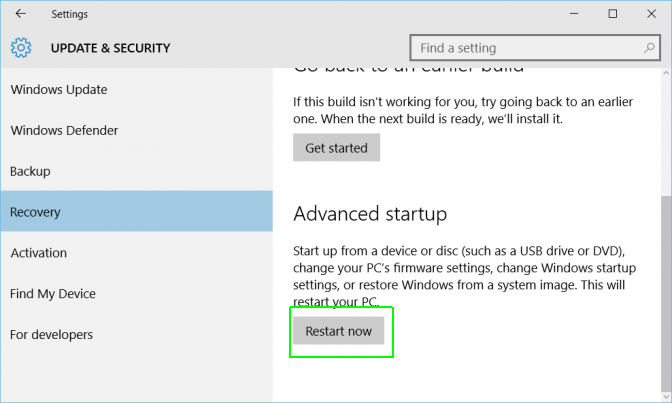
  5. Click Restart now under Advanced startup.
  6. enable discrete in bios

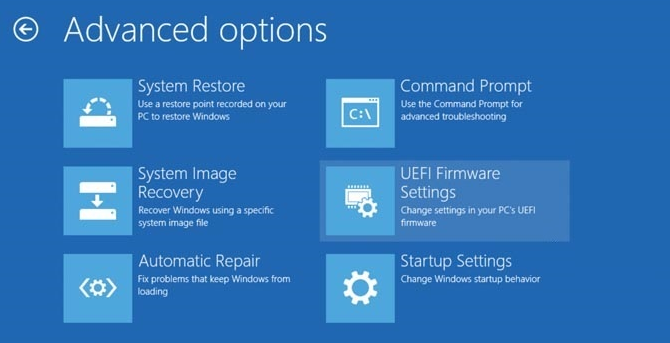
  7. In the opened menu, go to Troubleshoot > Advanced options > UEFI Firmware Settings and click Restart.
  8. enable discrete in bios

  9. When you enter BIOS you need to find Graphic’s device feature and select Discrete Graphics. This feature should be located in Display > Graphic’s device.
  10. enable discrete in bios

note

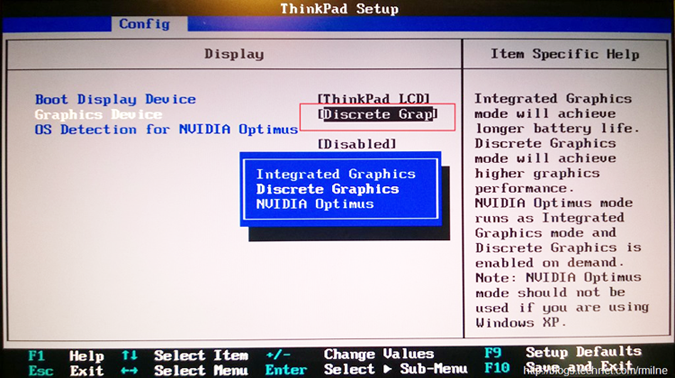
Keep in mind that this option is sometimes called Primary Graphics Card, dGPU Configuration, or switchable graphics so we recommend that you check your motherboard manual for detailed instructions.

Download Advanced System Repair

How to fix Driver PNP Watchdog error

How to fix Driver PNP Watchdog error

Driver PNP Watchdog error is a system issue that often appears while installing Windows 10 version 1803 Update. This happens when the user tries upgrading Windows 10, the update starts and then freezes at some stage and eventually showing the “Blue Screen of Death” (BSOD) with the Driver PNP Watchdog error. There are many reasons for the appearance of this error. It may be caused due to the system problems, the presence of viruses and other malware, out of date drivers or damaged hard drives of your PC and so on. As a result, the user can’t install important updates without facing Driver PNP Watchdog error. Below in this guide, you will find several methods to fix Driver PNP Watchdog error.

fix 0x80072ee7

Ways to fix Driver PNP Watchdog error :

Automatic solution

Repairing system errors may be not an easy task, so we should warn you that performing some of the steps may require above-average skills, so if you don’t feel experienced enough, you may apply to an automatic tool.

note

All operations are carried out in Safe Mode with networking. To load your system in this mode, perform the following steps:

For Windows XP/Vista/7

  1. Reboot you PC;
  2. Press F8 button when you turn on the computer;
  3. Advanced Boot Options menu should appear;
  4. Select Safe Mode with Networking;

For Windows 10

Since Windows 10 fails to load, and we can’t access System Configuration, let’s try using this simple method. The thing – Windows 10 turns on “Automatic Repair mode” (in this mode we can boot into Safe Mode) when it fails to boot 3 times in a row. To cause “Automatic Repair mode” we need to press “Reset” button when you see the Windows logo.

fix 0x80072ee7

If you’ve done it right, you will see a screen that your system is “Preparing Automatic Repair”

  1. Once “Automatic Repair” is loaded, press the “Advanced options” button.;
  2. Select “Troubleshoot” on the next screen.;
  3. Go to Troubleshoot -> Advanced options -> Startup Settings and press Restart;
  4. After Windows 10 restarts, you should press F5 key to Enable Safe Mode with Networking.

Once loaded, you need to download and launch it. Open and run a scan for Windows errors and Registry issues. The program itself will detect and fix all system errors preventing the operating system from booting.

Download Advanced System Repair

Steps of manual resolving

Solution 1. Remove problem causing registry entries

  1. Press Windows+R
  2. Input ‘regedit’ and hit the Enter key
  3. Go to the following location HKEY_LOCAL_MACHINE\COMPONENTS\
  4. Remove the below listed entries
    • AdvancedInstallersNeedResolving
    • PendingXMLIdentifier
    • NextQueueEntryIndex
    • Reboot the PC

Solution 2. Re-register the required components

  1. Initiate the search for ‘command prompt’ as administrator
  2. Type the following commands and hit Enter after each
      SC config wuauserv start= auto
      SC config bits start= auto
      SC config cryptsvc start= auto
      SC config trustedinstaller start= auto
    • Exit
  3. Reboot the PC

note

If you are not sure what type of system you are using, then simply right-click the My Computer or This PC icon and choose Properties – in the appeared window you will see the information on your system version.

Solution 3. Permit VSS Copy

  1. Go to the Control Panel
  2. Change the view type to Icons
  3. Choose Administrative tools and within it go to the Services tab
  4. There at the bottom of the window find the Volume Shadow Copy service and double-click it
  5. Click on the Startup type menu and select Automatic
  6. Confirm your choice by clicking OK

Solution 4. Delete Conflicting File

Use this method if the error message emerges when you’re performing an installation of software through InstallShield.

  1. Navigate to C:\Program Files\Common Files\InstallSheild\Professional\Runtime\ISProbe.tlb
  2. And remove ISProbe.tlb file

note

It is likely that you will need to view hidden files & folders to detect the file. For this open the Control Panel and click Folder Options. In the emerged window go to the tab View and mark the option ‘Show hidden files, folders, and drivers’

How to remove ‘TurboCad Symbols’ pop-up

How to remove TurboCad Symbols pop-up

TurboCad Symbols is an annoying message that may pop up in your web-browser. This happens when the user opens the browser and instead of the homepage, he sees a blank page with the window titled “Windows Installer” saying “the feature you are trying to use is on a CD-ROM or other removable disk that is not available. Insert the ‘TurboCad symbols and click OK”. There are many reasons for the appearance of this error, it may be caused due to the system problems, Windows update errors, the impact of the virus, out of date drivers or damaged hard drives of your PC and so on. As a result, the user can’t launch the browser without facing TurboCad Symbols pop-up. Below, you will find several methods to fix TurboCad Symbols pop-up.

fix 0x80072ee7

Update: As it was found out, the main culprit responsible for this pop-up is the Chrome browser itself or rather its last update. Google support is aware of that and they promised to fix it in the new update. In the meantime, we’ll have to handle this ourselves.

Ways to fix TurboCad Symbols pop-up :

Below we present instructions that may solve the problem. Depending on your system, the solutions may slightly differ, so perform the steps suitable for your system.

Automatic solution

Repairing system errors may be not an easy task, so we should warn you that performing some of the steps may require above-average skills, so if you don’t feel experienced enough, you may apply to automatic tool.

Download SpyHunter

Combo Cleaner Antivirus is an anti-malware program for those users who want to forget about numerous system issues like TurboCad Symbols pop-up. Aside from fixing TurboCad Symbols pop-up, CLeanMyPC will also automatically resolve other issues boosting your computer speed and stabilizing its performance.

Or you may use manual methods:

Steps of manual resolving

Solution 1. Reset browser’s settings

  1. For this, first, make a backup of your bookmarks if you want to keep them
  2. Then go to C:\Users\username\AppData\Local\Google\
  3. Select Chrome folder and rename it as you wish, for example, Chrome.old
  4. Re-launch Google Chrome to check if the problem is solved.
  5. Import your bookmarks

Solution 2. Run chkdsk command

  1. Initiate the search for cmd
  2. In the results find Command Prompt
  3. Right-click it and choose Run as Administrator
  4. In the appeared window input chkdsk C: (or other letter of your drive) /f /r
  5. Hit the Enter key

Solution 3. Re-register the required components

  1. Initiate the search for ‘command prompt’ as administrator
  2. Type the following commands and hit Enter after each
      SC config wuauserv start= auto
      SC config bits start= auto
      SC config cryptsvc start= auto
      SC config trustedinstaller start= auto
    • Exit
  3. Reboot the PC

Solution 4. Delete Conflicting File

Use this method if the error message emerges when you’re performing an installation of software through InstallShield.

  1. Navigate to C:\Program Files\Common Files\InstallSheild\Professional\Runtime\ISProbe.tlb
  2. And remove ISProbe.tlb file

note

It is likely that you will need to view hidden files & folders to detect the file. For this open the Control Panel and click Folder Options. In the emerged window go to the tab View and mark the option ‘Show hidden files, folders, and drivers’

Solution 5. Update drivers

This problem is also often solved by a simple driver update. Old drivers may cause system errors so we advise keeping all your drivers up-to-date. To simplify this task, you may engage the services of some third-party programs such as DriverMax.

Download Driver Updater

How to fix Windows 10 Update Error 0x80072ee7

How to fix 0x80072ee7 error

0x80072ee7 error is a common issue that often appears while installing Windows 10 Updates. There are many reasons for the appearance of this error. It may be caused due to the system problems, the presence of viruses and other malware, out of date drivers or damaged hard drives of your PC and so on. As a result, the user can’t install important updates without facing 0x80072ee7 error. Below in this guide, you will find several methods to fix 0x80072ee7 error.

fix 0x80072ee7

Ways to fix 0x80072ee7 error :

Below we present instructions that may solve the problem. Depending on your system, the solutions may slightly differ, so perform the steps suitable for your system.

Automatic solution

Repairing system errors may be not an easy task, so we should warn you that performing some of the steps may require above-average skills, so if you don’t feel experienced enough, you may apply to automatic tool.

CLeanMyPC The Advanced System Repair is an all-in-one tool for users who want to forget about numerous system issues like error 0x80072ee7. Aside from fixing error 0x80072ee7, CLeanMyPC will also automatically resolve other issues boosting your computer speed and stabilizing its performance.

Or you may use manual methods:

Steps of manual resolving

Solution 1. Remove problem causing registry entries

  1. Press Windows+R
  2. Input ‘regedit’ and hit the Enter key
  3. Go to the following location HKEY_LOCAL_MACHINE\COMPONENTS\
  4. Remove the below listed entries
    • AdvancedInstallersNeedResolving
    • PendingXMLIdentifier
    • NextQueueEntryIndex
    • Reboot the PC

Solution 2. Re-register the required components

  1. Initiate the search for ‘command prompt’ as administrator
  2. Type the following commands and hit Enter after each
      SC config wuauserv start= auto
      SC config bits start= auto
      SC config cryptsvc start= auto
      SC config trustedinstaller start= auto
    • Exit
  3. Reboot the PC

note

If you are not sure what type of system you are using, then simply right-click the My Computer or This PC icon and choose Properties – in the appeared window you will see the information on your system version.

Solution 3. Permit VSS Copy

  1. Go to the Control Panel
  2. Change the view type to Icons
  3. Choose Administrative tools and within it go to the Services tab
  4. There at the bottom of the window find the Volume Shadow Copy service and double-click it
  5. Click on the Startup type menu and select Automatic
  6. Confirm your choice by clicking OK

Solution 4. Delete Conflicting File

Use this method if the error message emerges when you’re performing an installation of software through InstallShield.

  1. Navigate to C:\Program Files\Common Files\InstallSheild\Professional\Runtime\ISProbe.tlb
  2. And remove ISProbe.tlb file

note

It is likely that you will need to view hidden files & folders to detect the file. For this open the Control Panel and click Folder Options. In the emerged window go to the tab View and mark the option ‘Show hidden files, folders, and drivers’

Solution 5. Update drivers

This problem is also often solved by a simple driver update. Old drivers may cause system errors so we advise keeping all your drivers up-to-date. To simplify this task, you may engage the services of some third-party programs such as DriverMax.

Download Driver Updater

How to fix 0x80073712 error

How to fix 0x80073712 Error

Message 0x80073712 is an error code that may appear on laptops and PCs when a user tries to install Windows 10 1709 Updates. It happens after users try to update Windows to version 1709. The error is caused by the system problems that could be resolved with system recovery utilities, but in fact, it is impossible. Sometimes, out of date drivers or damaged hard drives of your PC can lead to the same problem. In result user constantly faces system problems. Below in this guide, you will find several methods to fix 0x80073712 error.

fix 0x80073712

Ways to fix 0x80073712 error :

Below we present instructions that may solve the problem. Depending on your system, the solutions may slightly differ, so perform the steps suitable for your system.

Automatic solution

Repairing system errors may be not an easy task, so we should warn you that performing some of the steps may require above-average skills, so if you don’t feel experienced enough, you may apply to automatic tool.

CLeanMyPC The Advanced System Repair is an all-in-one tool for users who want to forget about numerous system issues like 0x80073712 error. Aside from fixing 0x80073712 error, CLeanMyPC will also automatically resolve other issues boosting your computer speed and stabilizing its performance.

Or you may use manual methods:

Steps of manual resolving

Solution 1. Remove problem causing registry entries

  1. Press Windows+R
  2. Input ‘regedit’ and hit the Enter key
  3. Go to the following location HKEY_LOCAL_MACHINE\COMPONENTS\
  4. Remove the below listed entries
    • AdvancedInstallersNeedResolving
    • PendingXMLIdentifier
    • NextQueueEntryIndex
    • Reboot the PC

Solution 2. Re-register the required components

  1. Initiate the search for ‘command prompt’ as administrator
  2. Type the following commands and hit Enter after each
      SC config wuauserv start= auto
      SC config bits start= auto
      SC config cryptsvc start= auto
      SC config trustedinstaller start= auto
    • Exit
  3. Reboot the PC

note

If you are not sure what type of system you are using, then simply right-click the My Computer or This PC icon and choose Properties – in the appeared window you will see the information on your system version.

Solution 3. Permit VSS Copy

  1. Go to the Control Panel
  2. Change the view type to Icons
  3. Choose Administrative tools and within it go to the Services tab
  4. There at the bottom of the window find the Volume Shadow Copy service and double-click it
  5. Click on the Startup type menu and select Automatic
  6. Confirm your choice by clicking OK

Solution 4. Delete Conflicting File

Use this method if the error message emerges when you’re performing an installation of software through InstallShield.

  1. Navigate to C:\Program Files\Common Files\InstallSheild\Professional\Runtime\ISProbe.tlb
  2. And remove ISProbe.tlb file

note

It is likely that you will need to view hidden files & folders to detect the file. For this open the Control Panel and click Folder Options. In the emerged window go to the tab View and mark the option ‘Show hidden files, folders, and drivers’

Solution 5. Update drivers

This problem is also often solved by a simple driver update. Old drivers may cause system errors so we advise keeping all your drivers up-to-date. To simplify this task, you may engage the services of some third-party programs such as DriverMax.

Download Driver Updater

How to fix 0x8007001f

How to fix 0x8007001f Error

Message 0x8007001f is a an error code that may appear when a user try to install Windows 10 1709 Updates. Some users write, that it happens right after they ran cumulative update for Windows Version 1709 (especially for amd64-based systems). The error is causes to the system problems that could be resolved with system recovery utilities, which are impossible to perform because of error 0x8007001f. Sometimes, out of date drivers for audio device of your PC can lead to the same problem. In result user can’t use a system. Below in this guide you will find several methods to fix 0x8007001f error.

fix 0x8007001f

Ways to fix 0x8007001f error:

Below we present instructions that may solve the problem. Depending on your system, the solutions may slightly differ, so perform the steps suitable for your system.

Automatic solution

Repairing system errors may be not an easy task, so we should warn you that performing some of the steps may require above-average skills, so if you don’t feel experienced enough, you may apply to automatic tool.

Download Advanced System Repair

The Advanced System Repair is an all-in-one tool for users who want to forget about numerous system issues like 0x8007001f error. Aside from fixing 0x8007001f error, will also automatically resolve other issues boosting your computer speed and stabilizing its performance.

Or you may use manual methods:

Steps of manual resolving

Solution 1. Remove problem causing registry entries

  1. Press Windows+R
  2. Input ‘regedit’ and hit the Enter key
  3. Go to the following location HKEY_LOCAL_MACHINE\COMPONENTS\
  4. Remove the below listed entries
    • AdvancedInstallersNeedResolving
    • PendingXMLIdentifier
    • NextQueueEntryIndex
    • Reboot the PC

Solution 2. Re-register the required components

  1. Initiate the search for ‘command prompt’ as administrator
  2. Type the following commands and hit Enter after each
      SC config wuauserv start= auto
      SC config bits start= auto
      SC config cryptsvc start= auto
      SC config trustedinstaller start= auto
    • Exit
  3. Reboot the PC

note

If you are not sure what type of system you are using, then simply right-click the My Computer or This PC icon and choose Properties – in the appeared window you will see the information on your system version.

Solution 3. Permit VSS Copy

  1. Go to the Control Panel
  2. Change the view type to Icons
  3. Choose Administrative tools and within it go to the Services tab
  4. There at the bottom of the window find the Volume Shadow Copy service and double-click it
  5. Click on the Startup type menu and select Automatic
  6. Confirm your choice by clicking OK

Solution 4. Delete Conflicting File

Use this method if the error message emerges when you’re performing an installation of software through InstallShield.

  1. Navigate to C:\Program Files\Common Files\InstallSheild\Professional\Runtime\ISProbe.tlb
  2. And remove ISProbe.tlb file

note

It is likely that you will need to view hidden files & folders to detect the file. For this open the Control Panel and click Folder Options. In the emerged window go to the tab View and mark the option ‘Show hidden files, folders, and drivers’

Solution 5. Update drivers

This problem is also often solved by a simple driver update. Old drivers may cause system errors so we advise keeping all your drivers up-to-date. To simplify this task, you may engage the services of some third-party programs such as DriverMax.

Download Driver Updater

How to fix 0x80070bc2 Error

How to fix 0x80070bc2 Error

Error 0x80070bc2 is a common trouble that may appear when a user try to install Windows 10 1709 Updates. Some users write, that it happens right after they ran KB4048955 cumulative update for Windows Version 1709 (especially for amd64-based systems). In result user can meet with the next trouble: System requires cycling restarting with message ….1709 requires a restart to finish installing. The error is sometimes causes to the system problems that could be resolved with system recovery or cumulative updates, which are impossible to perform because of error 0x80070bc2. Below in this guide you will find several methods to fix 0x80070bc2 error.

fix 0x80070bc2

Causes of receiving error 0x80070bc2 message

Error 0x80070bc2 may appear due to numerous reasons. Though the error message doesn’t give much information about reasons of error grounds, it is likely one of the list:

  • Improperly operating applications that are connected with system restore components, that cause instability
  • Files of System restore service that were altered or damaged
  • Disabled Volume shadow copy option, that System Restore is linked to
  • Executed Windows Update files (KB4048955, KB4054517)
  • Automatic Windows Updates

Ways to fix 0x80070bc2 error :

Below we present instructions that may solve the problem. Depending on your system, the solutions may slightly differ, so perform the steps suitable for your system.

Automatic solution

Repairing system errors may be not an easy task, so we should warn you that performing some of the steps may require above-average skills, so if you don’t feel experienced enough, you may apply to automatic tool.

CLeanMyPC The Advanced System Repair is an all-in-one tool for users who want to forget about numerous system issues like 0x80070bc2 error. Aside from fixing 0x80070bc2 error, CLeanMyPC will also automatically resolve other issues boosting your computer speed and stabilizing its performance.

Or you may use manual methods:

Steps of manual resolving

Solution 1. Remove problem causing registry entries

  1. Press Windows+R
  2. Input ‘regedit’ and hit the Enter key
  3. Go to the following location HKEY_LOCAL_MACHINE\COMPONENTS\
  4. Remove the below listed entries
    • AdvancedInstallersNeedResolving
    • PendingXMLIdentifier
    • NextQueueEntryIndex
    • Reboot the PC

Solution 2. Re-register the required components

  1. Initiate the search for ‘command prompt’ as administrator
  2. Type the following commands and hit Enter after each
      SC config wuauserv start= auto
      SC config bits start= auto
      SC config cryptsvc start= auto
      SC config trustedinstaller start= auto
    • Exit
  3. Reboot the PC

note

If you are not sure what type of system you are using, then simply right-click the My Computer or This PC icon and choose Properties – in the appeared window you will see the information on your system version.

Solution 3. Permit VSS Copy

  1. Go to the Control Panel
  2. Change the view type to Icons
  3. Choose Administrative tools and within it go to the Services tab
  4. There at the bottom of the window find the Volume Shadow Copy service and double-click it
  5. Click on the Startup type menu and select Automatic
  6. Confirm your choice by clicking OK

Solution 4. Delete Conflicting File

Use this method if the error message emerges when you’re performing an installation of software through InstallShield.

  1. Navigate to C:\Program Files\Common Files\InstallSheild\Professional\Runtime\ISProbe.tlb
  2. And remove ISProbe.tlb file

note

It is likely that you will need to view hidden files & folders to detect the file. For this open the Control Panel and click Folder Options. In the emerged window go to the tab View and mark the option ‘Show hidden files, folders, and drivers’

Solution 5. Update drivers

This problem is also often solved by a simple driver update. Old drivers may cause system errors so we advise keeping all your drivers up-to-date. To simplify this task, you may engage the services of some third-party programs such as DriverMax.

Download Driver Updater

How to fix 0x80070422 Error

How to fix error 0x80070422

Error 0x80070422 is a serious trouble that may happen when a user try to install Windows 10 1709 Update, for example KB4056892 (sometimes this update leads to 0x80070bc2 error). It means “The identities of the manifests are identical but their contents are different.”. The error is sometimes causes to the system problems that could be resolved with system recovery or cumulative updates, which are impossible to perform because of error 0x80070422. If you haven’t any restore points, in this guide you will find several methods to fix 0x80070422 Error.

error 0x80070422

Causes of receiving error 0x80070422 message

Error 0x80070422 may appear due to numerous reasons. Though the error message doesn’t give much information about reasons of error grounds, it is likely one of the list:

  • Improperly operating applications that are connected with system restore components, that cause instability
  • Files of System restore service that were altered or damaged
  • Disabled Volume shadow copy option, that System Restore is linked to
  • Executed the Windows Update files (KB4056892, e.t.c)
  • Automatic Windows Updates

Ways to fix 0x80070422 Error :

Below we present instructions that may solve the problem. Depending on your system, the solutions may slightly differ, so perform the steps suitable for your system.

Automatic solution

Repairing system errors may be not an easy task, so we should warn you that performing some of the steps may require above-average skills, so if you don’t feel experienced enough, you may apply to automatic tool.

CLeanMyPC The Advanced System Repair is an all-in-one tool for users who want to forget about numerous system issues like 0x80070422 error. Aside from fixing 0x80070422 error, CLeanMyPC will also automatically resolve other issues boosting your computer speed and stabilizing its performance.

Or you may use manual methods:

Steps of manual resolving

Solution 1. Remove problem causing registry entries

  1. Press Windows+R
  2. Input ‘regedit’ and hit the Enter key
  3. Go to the following location HKEY_LOCAL_MACHINE\COMPONENTS\
  4. Remove the below listed entries
    • AdvancedInstallersNeedResolving
    • PendingXMLIdentifier
    • NextQueueEntryIndex
    • Reboot the PC

Solution 2. Re-register the required components

  1. Initiate the search for ‘command prompt’
  2. Type the following commands and hit Enter after each
    • For 32 Bit OS: CD %WinDir%\System32
    • For 64 Bit OS: CD %WinDir%\SysWow64
    • RegSvr32 vbscript.dll
    • Exit
  3. Reboot the PC

note

If you are not sure what type of system you are using, then simply right-click the My Computer or This PC icon and choose Properties – in the appeared window you will see the information on your system version.

Solution 3. Permit VSS Copy

  1. Go to the Control Panel
  2. Change the view type to Icons
  3. Choose Administrative tools and within it go to the Services tab
  4. There at the bottom of the window find the Volume Shadow Copy service and double-click it
  5. Click on the Startup type menu and select Automatic
  6. Confirm your choice by clicking OK

Solution 4. Delete Conflicting File

Use this method if the error message emerges when you’re performing an installation of software through InstallShield.

  1. Navigate to C:\Program Files\Common Files\InstallSheild\Professional\Runtime\ISProbe.tlb
  2. And remove ISProbe.tlb file

note

It is likely that you will need to view hidden files & folders to detect the file. For this open the Control Panel and click Folder Options. In the emerged window go to the tab View and mark the option ‘Show hidden files, folders, and drivers’

Solution 5. Update drivers

This problem is also often solved by a simple driver update. Old drivers may cause system errors so we advise keeping all your drivers up-to-date. To simplify this task, you may engage the services of some third-party programs such as DriverMax.

Download Driver Updater

How to fix 0x80073715 Error

How to fix error 0x80073715

Error 0x80073715 is a common trouble that may appear when a user try to install Windows 10 Updates, for example KB4058258 or KB4056892. Commonly, it means “The identities of the manifests are identical but their contents are different.”. The error is sometimes causes to the system problems that could be resolved with system recovery or cumulative updates, which are impossible to perform because of error 0x80073715. Below in this guide you will find several methods to fix 0x80073715 error.

error 0x80073715

Causes of receiving error 0x80073715 message

Error 0x80073715 may appear due to numerous reasons. Though the error message doesn’t give much information about reasons of error grounds, it is likely one of the list:

  • Improperly operating applications that are connected with system restore components, that cause instability
  • Files of System restore service that were altered or damaged
  • Disabled Volume shadow copy option, that System Restore is linked to
  • Executed the Windows Update files (KB4058258, KB4056892, e.t.c)
  • Automatic Windows Updates

Ways to fix 0x80073715 error :

Below we present instructions that may solve the problem. Depending on your system, the solutions may slightly differ, so perform the steps suitable for your system.

Automatic solution

Repairing system errors may be not an easy task, so we should warn you that performing some of the steps may require above-average skills, so if you don’t feel experienced enough, you may apply to automatic tool.

CLeanMyPC The Advanced System Repair is an all-in-one tool for users who want to forget about numerous system issues like 0x80073715 error. Aside from fixing 0x80073715 error, CLeanMyPC will also automatically resolve other issues boosting your computer speed and stabilizing its performance.

Or you may use manual methods:

Steps of manual resolving

Solution 1. Remove problem causing registry entries

  1. Press Windows+R
  2. Input ‘regedit’ and hit the Enter key
  3. Go to the following location HKEY_LOCAL_MACHINE\COMPONENTS\
  4. Remove the below listed entries
    • AdvancedInstallersNeedResolving
    • PendingXMLIdentifier
    • NextQueueEntryIndex
    • Reboot the PC

Solution 2. Re-register the required components

  1. Initiate the search for ‘command prompt’
  2. Type the following commands and hit Enter after each
    • For 32 Bit OS: CD %WinDir%\System32
    • For 64 Bit OS: CD %WinDir%\SysWow64
    • RegSvr32 vbscript.dll
    • Exit
  3. Reboot the PC

note

If you are not sure what type of system you are using, then simply right-click the My Computer or This PC icon and choose Properties – in the appeared window you will see the information on your system version.

Solution 3. Permit VSS Copy

  1. Go to the Control Panel
  2. Change the view type to Icons
  3. Choose Administrative tools and within it go to the Services tab
  4. There at the bottom of the window find the Volume Shadow Copy service and double-click it
  5. Click on the Startup type menu and select Automatic
  6. Confirm your choice by clicking OK

Solution 4. Delete Conflicting File

Use this method if the error message emerges when you’re performing an installation of software through InstallShield.

  1. Navigate to C:\Program Files\Common Files\InstallSheild\Professional\Runtime\ISProbe.tlb
  2. And remove ISProbe.tlb file

note

It is likely that you will need to view hidden files & folders to detect the file. For this open the Control Panel and click Folder Options. In the emerged window go to the tab View and mark the option ‘Show hidden files, folders, and drivers’

Solution 5. Update drivers

This problem is also often solved by a simple driver update. Old drivers may cause system errors so we advise keeping all your drivers up-to-date. To simplify this task, you may engage the services of some third-party programs such as DriverMax.

Download Driver Updater

How to fix 0x0000007a KERNEL_DATA_INPAGE_ERROR

How to fix 0x0000007a KERNEL_DATA_INPAGE_ERROR

0x0000007a KERNEL_DATA_INPAGE_ERROR is an error that appears on an after-reboot screen that is also known as the Blue Screen of Death. For many users this message becomes a problem as sometimes the error repeats itself, even after the user performs the steps of the solutions that the system offers. To help the users to break the loop of continuous restarts and Blue Screens we’ve written this guide that describes how to fix 0x0000007a KERNEL_DATA_INPAGE_ERROR.

0x0000007a KERNEL_DATA_INPAGE_ERROR

Causes of receiving 0x0000007a KERNEL_DATA_INPAGE_ERROR message

0x0000007a KERNEL_DATA_INPAGE_ERROR may appear due to numerous reasons. Though the error message doesn’t give much information about reasons of error grounds, it is likely one of the list:

  • Failing System Memory
  • Damaged file system
  • Damaged hardware

Ways to repair 0x0000007a KERNEL_DATA_INPAGE_ERROR:

Below we present instructions that may solve the problem. Depending on your system, the solutions may slightly differ, so perform the steps suitable for your system.

Automatic solution

Repairing system errors may be not an easy task, so we should warn you that performing some of the steps may require above-average skills, so if you don’t feel experienced enough, you may apply to automatic tool.

Download CleanMyPC

Total PC Care is all-in-one and must-have tool for users who want to forget about numerous system issues like 0x0000007a KERNEL_DATA_INPAGE_ERROR. Aside from fixing 0x0000007a KERNEL_DATA_INPAGE_ERROR, Total PC Care will also automatically resolve other issues boosting your computer speed and stabilizing its performance.

Steps of manual resolving

Solution 1. Run chkdsk command

  1. Initiate the search for cmd
  2. In the results find Command Prompt
  3. Right-click it and choose Run as Administrator
  4. In the appeared window input chkdsk C: (or other letter of your drive) /f /r
  5. Hit the Enter key

Solution 2. Check logs in Event Viewer

  1. Initiate the search for Administrative Tools
  2. In the results find Administrative Tools and launch them
  3. Double-click the Computer Management icon
  4. In the Event Viewer tree find Windows logs section
  5. Choose System
  6. Look through the log to find the information that states what exactly caused the error

Solution 3. Run Memory Diagnostics Tool

  1. Initiate the search for Memory Diagnostic
  2. In the results find Windows Memory Diagnostic and launch it
  3. Follow the on-screen wizard instructions and wait for the results

Solution 4. Check hardware units

If none of the fixes presented above solved the problem, then likely the root of the issue is in the hardware malfunctioning. To test this variant one by one remove hardware peripherals and restart the system to see, if the error emerges this time.