


What is Reimage Repair?
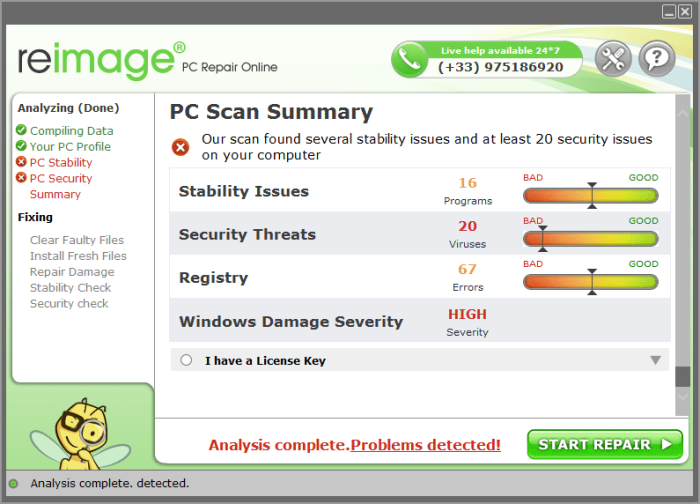
Reimage Repair is a fake system optimization tool developed by Reimage company. The program closely resembles the other of this type, so it easily befools people. The application mimics the functions of real optimizers and even imitates system scans. However, the result is always predictable – Reimage Repair will raise a scare about PC condition. Then it will play out a helpful tool that is capable of fixing every error and raising your PC performance. With a small ‘if’ – if only you purchase its license. Which doesn’t make sense, as in actual fact, Reimage Repair doesn’t have this function. So, you can uninstall Repair Image with an easy mind and replace it with a reliable program.
How Reimage Repair got installed on your computer?
The application can be installed by mistake by users who look for a system repairing tool. As we’ve mentioned, Reimage Repair has a perfect disguise, so it’s unsurprising. However, there is another way for the program to end up on a computer. Many setups now have so-called complimentary components, which the majority of users perceive as pleasant bonuses. Nevertheless good the presented software may seem, you should double-check its liability on the Internet and only then agree or disagree on its installation.
How to remove Reimage Repair?
To delete Reimage Repair completely you need to remove the application from the Control Panel and then check the drives for such leftovers as Reimage Repair files and registry entries.
We should warn you that performing some of the steps may require above-average skills, so, if you don’t feel experienced enough, you may apply to automatic removal tool.
Performing an antimalware scan with Norton would automatically search out and delete all elements related to Reimage Repair. It is not only the easiest way to eliminate Reimage Repair, but also the safest and most assuring one.
Steps of Reimage Repair manual removal
Uninstall Reimage Repair from Control Panel
You could have downloaded the program yourself but, as it was stated before, more likely that the rogue application appeared on your system brought with other software. So, to get rid of Reimage Repair you need to call to memory what you have installed recently.
How to remove Reimage Repair from Windows XP
- Click the Start button and open Control Panel
- Go to Add or Remove Programs
- Find the application related to Reimage Repair and click Uninstall
How to remove Reimage Repair from Windows 7/Vista
- Click the Start button and open Control Panel
- Go to Uninstall Program
- Find the application related to Reimage Repair and click Uninstall
How to remove Reimage Repair from Windows 8/8.1
- Right-click the menu icon in left bottom corner
- Choose Control Panel
- Select the Uninstall Program line
- Uninstall the application related to Reimage Repair
How to remove Reimage Repair from Windows 10
- Press Win+X to open Windows Power menu
- Click Control Panel
- Choose Uninstall a Program
- Select the application related to Reimage Repair and remove it
 If you experience problems with removing Reimage Repair from Control Panel: there is no such title on the list, or you receive an error preventing you from deleting the application, see the article dedicated to this issue.
Read what to do if program won’t uninstall from Control Panel
Delete files and registry entries added by Reimage Repair
Sometimes removal via Control Panel is not enough since the built-in application can leave some files. So, you need to find all of the following items and delete them.
Remove Reimage Repair files and folders:
Program Files\reimage\reimage repair\

REI_Axcontrol.dll

REI_Engine.dll

ReimageReminder.exe

savapi3.dll

ReimageRepair.exe

uninst.exe

LZMA.EXE

REI_AVIRA.exe

REI_SupportInfoTool.exe

ReimageSafeMode.exe

it helped me thank you so much..